Other
Basic Sewing Stitches
You've spent all summer using and abusing your gear. As the end of camping season approaches you're going to want to inspect all of your equipment rips, tears, holes, and any other things that might prevent your gear from performing. A few simple repairs can be made with a needle and thread. Here are some handy tips on what types of stitches you can use to repair your gear.
Running Stitch
The running stitch is used to make simple seams in fabrics. It is easily completed by passing your needle in and out of the fabric at equal distances of approximately 1/4”. The stitches on the topside of your fabric should be the same length of the stitches on the underside of your fabric.

Backstitch
The backstitch is one of the strongest types of hand-sewn stitches. The back stitch is used for making small, tight seams that will not leak filling (sleeping bags).
Step 1:
Start out by sewing a couple of stitches over the same spot, and then sew a stitch with a space. Insert the needle from the underside of the fabric layers 1/8” to the left of where your stitching will begin. Pull the thread through to the knot.

Step 2:
Insert the needle 1/8 inch behind where the thread emerges (where your stitching will begin). Bring the needle up 1/4” beyond this insertion, and pull the thread snugly. Bring the needle up 1/4” beyond.

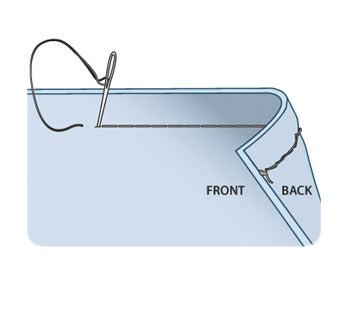
Step 3:
Viewed from the top, backstitching appears as a continuous line of even stitches; viewed underneath, the stitches are twice as long as those on top and they overlap at the ends.

Originally Published: Aug 16, 2014